Thinking of giving your space a glow-up? You're in the right place. How to Install Pendant Light? is your no-fluff guide to turning that boxed-up fixture into a showpiece. Installing a pendant light might seem like a job for an electrician, but with the right prep, it's totally doable—even for weekend warriors.

Tools, ceiling prep, wire know-how—we cover the essentials, plus the stuff most guides forget. Picture hanging a plant from the ceiling, but this one lights up and needs a few wires hooked up right.
This isn’t just about swapping bulbs—it’s about getting it right the first time, so your light hangs straight, works clean, and doesn’t flicker like a haunted house. Let’s knock this out together.
Types of Pendant Lights
Pendant lights come in many styles, and picking the right one starts with understanding your space, mood, and design goals.
Glass pendants for ambient lighting
Glass pendants create a cozy, diffused glow—perfect for soft ambient lighting. They're ideal for dining rooms, bedrooms, or reading corners. Use a soft cloth and glass cleaner regularly for upkeep. Bonus tip: frosted glass hides dust better than clear styles.
Quick cleaning tip:
- Weekly dusting = longer shine life
- Avoid harsh chemicals that dull the glass
- Go for layered lighting: use with floor lamps or sconces

Modern minimal vs. industrial pendant styles
Modern minimal pendants lean sleek, using matte finishes and simple lines. Think Scandinavian vibes. Industrial ones? They're beefier—exposed bulbs, rough metals, warehouse charm.
“The industrial look never really goes out of style—it evolves with the finishes,” says lighting designer Claire Weston.

Comparison Table: Modern vs. Industrial
| Style | Materials | Popular Finish |
|---|---|---|
| Modern | Glass, aluminum | Matte black, white |
| Industrial | Steel, iron | Bronze, rusted |
Multi-light fixtures for large spaces
If you're working with tall ceilings or wide rooms, go big with multi-light fixtures. They spread illumination evenly and become bold focal points. Think of them as chandeliers in pendant form—stylish and efficient.
- Measure your ceiling height and room width
- Look for adjustable rods or hangers
- Space out bulbs for balanced lighting
Great for living rooms, lofts, and open kitchens!

Choosing color temperature and bulb type
Picking the right bulb type and color temperature makes a massive difference in vibe.
- Warm (2700–3000K): Cozy, yellow tones for relaxing zones
- Cool (4000–5000K): Crisp white for workspaces
- LEDs: Long life, energy efficient
- Incandescent: Great color rendering, but less efficient
Pro tip: Always check CRI (Color Rendering Index) if true color matters—like over a vanity or kitchen island.

Best pendant lights for kitchen islands
Kitchen islands need focused task lighting plus a splash of style. Pendant lights should hang 30–36 inches above the counter. Look for adjustable heights, easy-clean lamp shades, and coordinated finishes with your cabinets.
🟢 Use two or three pendants depending on island length.
🟢 Go wide for more coverage if you cook a lot.
🟢 Try dimmers for mood lighting during dinner parties

What Tools Do You Need to Install a Pendant Light?
Getting your tools together before diving into a pendant light install is half the battle. Here’s what you’ll need to get started right—no surprises mid-project!
Essential electrician hand tools list
Before you touch a single wire, you’ll want a solid stash of tools. Not just any toolbox junk, but the right stuff for clean, safe installs:
- Screwdrivers – Flathead and Phillips for mounting brackets and fixture screws
- Pliers & Lineman’s pliers – For gripping, twisting, and cutting wires
- Wire strippers – A must for clean, fast wire prep
- Voltage tester – Safety first—always check for live wires
- Multimeter – For advanced testing like checking resistance or current
- Fish tape – Snakes wires through walls or ceiling spaces
- Electrical tape & cable ties – Tidy up your final connections
- Level, hammer, utility knife – For mounting and clean finishes

“A well-packed electrician’s pouch is like a chef’s knife roll—precision gear for a precise job,” says Brian Dalton, licensed electrician and YouTube DIY educator.
Ladder height and workspace setup
Hate wobbly ladders or dust in your eyes? Then let’s talk setup:
- Choose the right ladder – For ceiling lights, a 6–8 ft stepladder usually does the trick. High ceilings? You might need a work platform or scaffolding.
- Prep your workspace – Lay drop cloths and plastic sheeting to catch debris. Use work lights if natural light’s bad.
- Safety gear – Always wear gloves, safety glasses, and if it’s a high job, a safety harness or fall protection is a must.
- Bonus tip – Keep tools within arm’s reach. Hanging a toolbelt off the ladder can save tons of time!

Voltage tester vs. circuit breaker finder
These two gadgets might sound similar, but they serve very different (and equally important) roles:
| Tool | Primary Use | Best For |
|---|---|---|
| Voltage tester | Checks if a wire is live | Basic safety before handling wires |
| Circuit breaker finder | Locates breaker linked to outlet | Turning off correct breaker safely |
| Multimeter | Measures volts, amps, resistance | Diagnosing deeper electrical issues |

Use a non-contact voltage tester for quick checks. When dealing with unknown breakers? A circuit breaker finder saves you guesswork—and risk. Always be aware of GFCI outlets, especially in kitchens and bathrooms!
How to Safely Shut Off Power Before Installation?
“When working with electricity, even something as simple as installing a pendant light can turn risky without taking the right precautions,” says Thomas Yates, a licensed master electrician with over two decades in residential wiring. He emphasizes, “Turning off the power is not a suggestion. It is the first rule of staying alive.”
Before reaching for any tool, the main power switch on your electrical panel must be your focus. Locate the circuit breaker labeled for the area where you plan to work. If labeling is unclear, it is best to shut off the entire home’s electricity via the main breaker. This prevents accidental shock from an energized ground wire or exposed terminals.

Wearing protective gear is more than protocol—it protects against unexpected power outages or shorts. Gloves with insulation, protective eyewear, and rubber-soled shoes are non-negotiable. Once the power is off, use a voltage tester to double-check. “Even seasoned pros test twice,” says Yates.
Essential Safety Reminders:
- Never touch bare wires without confirming no voltage.
- Always cap exposed wires with wire nuts or cover them with electrical tape.
- Work in good lighting and avoid damp conditions.
The National Electrical Code (NEC) recommends homeowners consult certified electricians for verification. Brands like Klein Tools and Fluke offer UL-certified voltage testers, widely trusted by professionals.

🔌 A single step—shutting off power—anchors the entire installation process. Take it seriously. Stay grounded, both figuratively and literally.
Ceiling Prep and Junction Box Setup
Prepping your ceiling is a big deal—skip it, and you risk a shaky or unsafe fixture. Here's how to do it right before mounting that pendant light.
-
Finding ceiling joists for secure mounting
Use a stud finder (electronic or magnetic) to locate ceiling joists. If unsure, try the tapping method to identify denser areas. Drill pilot holes to confirm before using mounting screws or anchors. Construction methods vary, so always check load-bearing capacity if hanging a heavier light.

-
Installing ceiling-rated junction boxes
Not all junction boxes are equal—go with ceiling-rated ones for lighting. Ensure it supports your fixture’s electrical load, and secure with a romex connector. Connect wires using wire nuts, then tape them with electrical tape. Always turn off the circuit breaker first and follow NEC guidelines.

-
Running wires through finished ceilings
Yeah, this part can be tricky. If your ceiling’s closed up, you’ll need tools like fish tape or a wire snake to pull electrical wires across obstacles. A flexible drill bit helps bore through tight spots, especially near insulation or drywall. Always double-check local electrical code.

-
When to use a pancake box
A pancake box is perfect for shallow ceilings or when you’ve got limited space. Ideal for retrofit applications and tight wiring conditions, this shallow junction box mounts directly to the surface. Just make sure your fixture weight and code compliance align with the install method.

-
Reinforcing ceiling for heavy fixtures
If you’re mounting a hefty pendant, reinforcement’s a must. Add wood blocking or metal bracing between ceiling joists. Use a mounting plate or toggle bolts for extra structural support. This spreads the weight distribution, preventing ceiling sagging or worse—total fixture failure.

Old work box vs. new construction box
| Type | Best Use Case | Key Feature |
|---|---|---|
| Old Work Box | Retrofit projects | Fits in drywall cutouts |
| New Construction Box | Before drywall install | Attaches to framing studs |
| Hybrid Option | Mixed remodels | Adapts to various scenarios |
Knowing when to use an old work box vs. a new construction box depends on timing—framing stage or remodeling. Old work is best for existing ceilings, while new boxes allow pre-wiring and easier placement during electrical rough-ins.
💬 “Most install issues happen before the fixture’s even hung—get your box and bracing right, and you’re 90% there.” — David Ramirez, Licensed Electrician (20+ years)
How to Adjust the Hanging Height of a Pendant?
Want your Pendant Light to look just right? Getting the height right is key for comfort, style, and function—especially over a Dining Table or Kitchen Island.
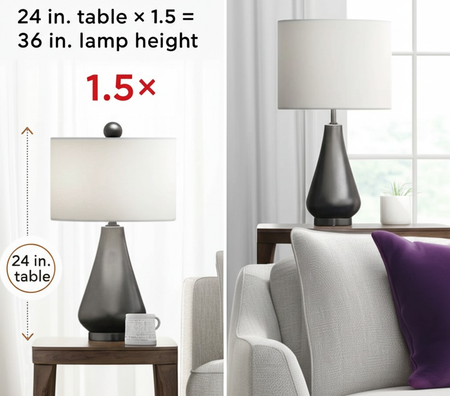
Ideal pendant height above a table
For most setups, the ideal Pendant Height above a Dining Table or Kitchen Island is between 30 and 36 inches from tabletop to the bottom of the Light Fixture. This range keeps the lamp at eye level without blocking conversation or sightlines.
✅ Pro tip: With higher ceilings (over 9 ft), go a bit higher or use adjustable Chain or Rod systems.

Trimming and threading pendant rods
This one’s for the hands-on DIYers. Let’s say your Pendant Rod is too long—it happens a lot.
- Measure your desired length with Measuring Tape.
- Use a Rod Cutter or saw to trim it clean.
- Thread the rod with a Threading Tool or Die, creating clean grooves for the Nipple or Coupling.
- Don’t forget to slide the Electrical Wire back through, and use a Wire Stripper to prep it.
⚠️ Safety Glasses = must-have. Cutting metal? Protect those eyes.

Wiring and Mounting Steps
“You know, a secure pendant light install is not just about making it look pretty,” said Mark Jensen, a certified electrician with over 20 years of residential wiring experience. “It is about making it safe, solid, and future-proof.”
Step 1 - 🔧 The Setup Begins with the Electrical Box
The first thing Mark checks? “That the electrical box is ceiling-rated. If it is wobbly, your whole pendant could end up on the floor.” He recommends metal or heavy-duty plastic boxes fastened directly into the joists.

Step 2 - 🧰 Connecting the Wires with Care
Inside the box, there are three wires: live, neutral, and ground. “Line up the pendant wires with the house wires: black to black, white to white, and green to ground. Use quality wire connectors—not those cheap twist-ons that crack.” Mark always wraps connections with electrical tape for added security. “It is old-school, but it keeps things tight, especially in older homes.”

Step 3 -🛠️ Mounting the Bracket and Pendant Light
Next, attach the mounting bracket using long screws into the electrical box. “If it moves, the light moves. That is a hard no for me.” Once secure, lift the pendant light into position, threading the wires neatly through the canopy.
Mark grinned as he tightened the final screw. “There is nothing better than flipping that switch and seeing it glow.”

📌 Pro Tip: UL-listed parts, expert-approved tools, and code-compliant setups are essential. Look for certifications on the packaging—those logos are not just for show.
What to Check After Installation?
You’re almost done! Here’s how to double-check your pendant light install and fix any post-install quirks like alignment or brightness.
Testing light switch and fixture connection
Always turn the circuit breaker back on and test the light switch. If the fixture connection doesn’t respond, use a voltage tester or outlet tester to check power flow. Tighten any loose wire connectors and recheck the wiring using a continuity tester. Faulty connections may require undoing the electrical tape and reconnecting using a screwdriver.
Pro Tip: “Never trust the breaker label—use testers,” says licensed electrician Jamie Cruz.

Fixing crooked or leaning pendants
You stand back… and your pendant light is doing the Leaning Tower of Pisa thing. No worries.
- Use a level to check the angle.
- Loosen the ceiling canopy with a wrench.
- Adjust the downrod or cord while checking height with a measuring tape.
- Tighten screws and secure with electrical tape if needed. Sometimes a twist in the cord or uneven mount causes the lean—fixing that can make a huge visual difference.

Checking canopy and bracket tightness
A wobbly canopy or loose fixture? That’s usually just bad mounting hardware work.
- First, use a stud finder to confirm you’ve mounted into the ceiling securely.
- Then, inspect the bracket and canopy for gaps.
- Tighten all screws using a screwdriver or wrench.
- Check alignment with a level. Pro tip: Use a helper to hold the fixture steady during tightening—it makes your life easier.

Replacing bulbs with correct wattage
Get this wrong, and you’re risking heat damage or flickering. Always match the light bulb wattage with what your fixture allows. Here’s a quick breakdown:
| Bulb Type | Max Wattage | Lumens Output |
|---|---|---|
| LED | 10W | ~800 lm |
| Incandescent | 60W | ~2000 lm |
| CFL | 14W | ~900 lm |
Double-check the socket label, and make sure the bulb base matches too—whether screw-in, GU10, or bi-pin. LEDs are often best for energy efficiency and longevity.

Conclusion: Let That Light Shine
Swapping in a pendant light isn’t rocket science—it’s more like hanging a piece of jewelry for your ceiling. You’ve done the heavy lifting, from picking the right fixture to flipping that final switch.
As electricians like Mike Holmes say, “Do it right the first time, and you’ll only do it once.” A solid install means no flickering, no wobble—just good vibes.
Now your room has that cozy, designer feel without the high-end price tag. Kinda cool what a few tools and a free afternoon can do, huh?
Got the itch to upgrade more? Maybe that old hallway light’s next.