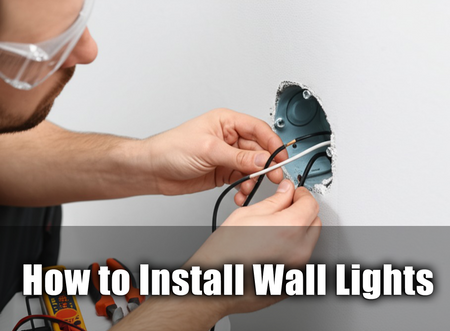
Ever looked at a room and felt like something’s missing? That soft glow on the wall, the vibe of a boutique hotel—that’s the power of a wall sconce. In this guide, how to install wall lights?, we’ll break down the process in plain English, so you can go from “meh” to “wow” in a single afternoon, no electrician badge required.

Installing wall lights isn't just about aesthetics—it’s about function, safety, and a little bit of swagger. As electrician Tom Silva says, “It’s not hard if you respect the power.” And honestly, once you know where to place them and how to connect things safely, it’s no harder than hanging a shelf and plugging in your coffee maker.
Wall Sconce Types and Styles
Understanding styles helps you pick sconces that actually fit your home—not just physically, but vibe-wise too.
Modern vs. Traditional Sconce Designs
When comparing modern design with traditional design, you’re essentially deciding between sleek minimalism and vintage charm.
- Modern sconces often feature geometric shapes, matte finishes, and LED tech for efficient light sources.
- Traditional sconces bring curves, bronze or brass finishes, and lamp shade compatibility that adds classic warmth to your home décor.

Pro tip: Match your mounting hardware and wall paint tone for a clean aesthetic finish. "Design isn't just style—it's how a space feels," says interior lighting expert Karen Elman.
Choosing Fixtures for Small Rooms
Small rooms need big lighting decisions.
-
Go compact – slim lighting fixtures or flush-mounted wall lamps maximize wall space.
-
Balance brightness – choose warm white color temperature with wide light distribution for coziness.
-
Pick pieces that pop – even a tiny lamp style can be a centerpiece if you match it with your vibe. Pro tip: Keep an eye on energy efficiency if you’ve got multiple fixtures.

Outdoor-Rated Sconces for Exteriors
Not all sconces can handle the outdoors. You need weatherproof fixtures with solid safety ratings to face the elements. Look for:
- Material & Finish: Stainless steel or powder-coated aluminum = no rust.
- Light Output: Aim for 800–1200 lumens for security lighting.
- Design Style: Even tough fixtures can look good—match to your landscaping or entry aesthetic.
| Sconce Type | Safety Rating | Avg. Lumen Output |
|---|---|---|
| LED Outdoor | IP65 | 900 lm |
| Motion Sensor | IP44 | 1100 lm |
| Decorative Wall | IP55 | 750 lm |

Where Should Wall Lights Go?
Proper placement is key to making wall lights effective and stylish. These tips will help you get it right without needing a lighting degree.
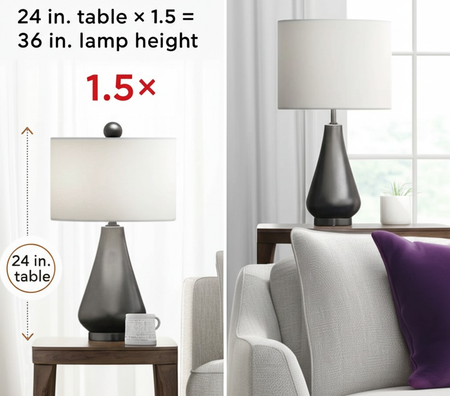
Ideal Height for Wall Light Mounting
For most homes, the sweet spot for mounting height is 60–66 inches from the floor—aka just above eye level when seated. This helps minimize glare and keeps light fixtures aligned with your lighting design.
But hey, don’t ignore the ceiling height and furniture placement—if your ceilings are higher than 9 feet or you're placing sconces near a tall headboard, raise the lights a few inches to keep things balanced.

Spacing Lights for Balanced Illumination
- Calculate lumens needed for your room size—typically 20 lumens per sq. ft. for general ambient lighting.
- Plan light spacing around 4–6 feet apart on average, but this depends on task lighting vs. accent lighting needs.
- Avoid shadowing by staggering lights across walls and adjusting for furniture blocking paths.
| Room Type | Ideal Spacing | Lumens per Fixture |
|---|---|---|
| Hallway | 6–8 ft | 400–600 |
| Living Room | 4–6 ft | 600–800 |
| Bathroom | 3–5 ft | 500–700 |

Avoiding Glare in Seating Areas
Lighting a seating space? Avoid placing wall lights right at eye level, especially near sofas or reading chairs. It’s a straight-up recipe for eyestrain.
Go for diffused light using frosted shades or downward-facing sconces, and keep brightness adjustable. If you can see the bulb while chillin’, it’s too low. Pro tip? Position lights to bounce softly off nearby walls for cozy ambient lighting.

Tools and Prep List
Before you touch any wires or drywall, make sure your toolbox is ready. The right tools will save time—and probably save your fingers, too.
Must-Have Tools for Safe Wiring
If you're messing with wires, do it right—or don't do it at all. Here's your bare-minimum gear for safe DIY wall light installs:
- Wire strippers & crimping tool – For clean cuts and tight connections
- Voltage tester – Don’t guess; know if a line is live
- Screwdrivers & fish tape – For reaching and securing connections
- Electrical tape, wire connectors – Safe and snug fittings
- Circuit breaker finder – Locate and label with confidence
- Safety glasses & work gloves – Keep those hands and eyes protected
As one home electrician put it:
"A voltage tester costs $15 and could save your life—skip the coffee, buy the tester."

Mounting Kits vs. Individual Parts
Not all lights come with a full setup. So, what’s the smarter buy?
Mounting kits are ready-to-go bundles. They usually include:
- A mounting bracket
- Screws, anchors, and often a check ring fitter
- Sometimes even a lamp nipple, washer, and finial for shade support
Individual parts, on the other hand, give you flexibility—especially for custom jobs or vintage light conversions. Just know what you're shopping for, because hunting for a missing electrical box or harp can be a major time-waster.
Is It Safe to Install Wall Lights Myself?
Safety precautions are not optional when dealing with electrical wiring. Before touching anything, the circuit breaker must be turned off and verified using an electrical tester. Even experienced homeowners make the mistake of assuming power is off when it is not. As lighting expert Elaine T. Ward of the American Lighting Association states, “Testing before touching is the single most important habit for safe fixture installation.”
🏠 Key Safety Essentials:
- Always shut off the circuit breaker at the main panel
- Use an electrical tester to verify the wall wires are dead
- Double-check grounding wire connection to reduce fire risk
- Secure the mounting bracket tightly to the wall box
- Use wire connectors that match the gauge and material
- Fasten all screws snugly to avoid fixture wobble

Homeowner John Castillo shared his first-time experience: “Installing the fixture itself was straightforward, but I underestimated how tricky it would be to line up the wall box with the mounting bracket. And I nearly skipped grounding—until I saw sparks testing a different light.”
A misplaced grounding wire or over-tightened screw can lead to short circuits or poor stability. Installing light bulbs before completing the wiring adds risk if power was not truly off. These lessons are not just advice—they are cautionary tales.
Hardwire or Plug-In: Which to Choose?
Choosing between plug-in and hardwired lighting? This section breaks down the practical pros, cons, and hacks to help you make the right call for your setup.
Pros of Plug-In Wall Sconces
Plug-in wall sconces are perfect for renters or anyone who wants zero-hassle lighting.
- Convenience: Just plug in—no electrician required.
- Portability: Move them whenever, wherever.
- Affordability: No wiring = no extra labor costs.
- Style Flexibility: Tons of design variety to match your room vibe.
- Cord Management: With a few clips or a raceway, it’s a clean look.
“Plug-ins are the go-to for design versatility with zero commitment.” – Jana Mitchell, Lighting Designer

Common Issues with Hardwired Installs
Hardwired lighting gives a clean, professional finish—but comes with baggage:
- Wiring Problems – Old homes may lack proper junction boxes.
- Electrical Issues – You’ll need a circuit breaker assessment.
- Wall Damage – Cutting into drywall isn’t beginner-friendly.
- Code Compliance – Must meet local building codes.
- Compatibility – Some fixtures won’t fit standard electrical boxes.
Pro tip: If you're not 100% sure about electrical stuff, don’t DIY—hire a licensed electrician.

Surface Cord Concealing Solutions
Don’t let cords mess with your aesthetic!
- Cord Covers: Snap-on raceways or adhesive cord hiders keep things tidy.
- Paint Matching: Paint cord covers to blend into walls seamlessly.
- DIY Tricks: Run cords along trim lines or behind furniture.
- Decorative Options: Try rope lights in a cord cover for a creative twist.
Mounting and Wiring Steps
“It looks easy until you are upside down under a light with a screwdriver in your mouth,” laughed Linda Raye, a licensed electrician and instructor at North Metro Trade School. Her years of field experience emphasize that while the process is doable, each step deserves deliberate attention. Here is the step-by-step guide she gives new apprentices.
Step 1 - Shut Off the Power at the Circuit Breaker
- Flip the switch for the lighting circuit in your home’s breaker panel.
- Test with a non-contact voltage tester to ensure zero current.
- “If the wires buzz, stop. Do not touch them. It is not worth the risk,” says Linda.

Step 2 - Secure the Electrical Box
- Confirm that the electrical box is rated for lighting fixtures and firmly mounted.
- Use wood screws into studs or toggle anchors if the wall lacks support.
- Flush mounting is essential for stability and wire clearance.

Step 3 - Install the Mounting Bracket
- Use the screws included with your fixture to install the mounting bracket to the electrical box.
- Align the bracket so the fixture will sit straight once attached.

Step 4 - Match and Connect the Wires
- Connect the ground wire (usually green or bare copper) to the grounding screw on the bracket and the fixture’s ground.
- Twist the hot wire (black) from the wall with the black fixture wire.
- Do the same for the neutral wire (white to white).
- Secure all connections with wire connectors or wire nuts, then wrap with electrical tape.

Step 5 - Attach the Fixture
- Push the wires gently into the box.
- Align the fixture base with the bracket, and secure it with the provided mounting screws.
- Tighten evenly to prevent tilting.

Step 6 - Restore Power and Test
- Flip the circuit breaker back on.
- Turn on the wall switch. If the fixture lights up and feels secure, the job is done.

Conclusion
You’ve scoped the styles, picked your spot, and sorted your tools—now you’re ready to make it happen. Think of installing a wall light like hanging a picture frame that glows. It’s part precision, part vibe check.
Safety’s not just a buzzword—it’s your best friend here. As Mike Holmes says, “If you're going to do it, do it right.” That means turning off the power and checking it twice.
Remember, every room gets brighter when you’ve got the right light and the guts to hang it.